


Thermaltake HardCano 12 Review
I know many enthusiasts who have had the problem of noise from their PC and frankly I am one of those people. Most noticeably, case fans throughout the case interior make up the majority of that noise and frankly, it becomes of an annoyance. One way of solving or at least helping the issue is needing a fan controller. Thermaltake introduced their newest product a couple of weeks ago and that was the HardCano 12 and we have the pleasure of looking at it today.
Specifications
- Device Space: 5.25” driver device
- Dimensions: 148 x 42 x 166 mm Temp. Setting 20.0 °C ~ 80.0 °C (50 °C default)
- Backlight LCD Display: 4 sets of temperature display, 4 sets of fan speed display, 4 sets of fan failure display, Alarm item flash, Fashion blue EL back lighted
- Monitor Display Temp. Range: 23 °C ~ 89 °C(73 °F ~ 192 °F)
- Alarm Temp. Setting: 40 °C ,50 °C,60 °C,70 °C(60 °C default)104 °F ,122 °F ,140 °F ,158 °F(140 °F default) Fan Voltage Input 12V
- Material: Plastic and Aluminum Alloy
- Weight: 400g
-Here is a picture of the back of the box
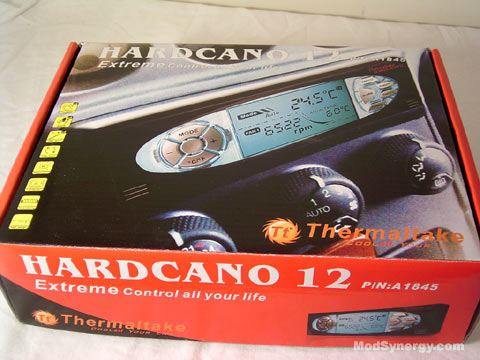
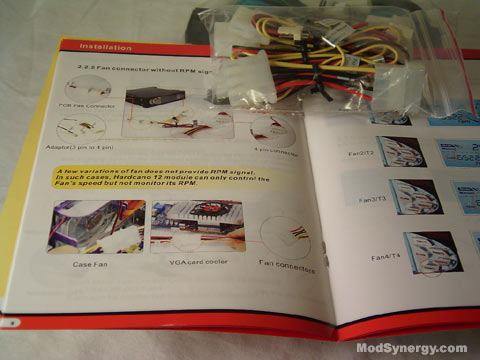
The Thermaltake HardCano 12 arrived in perfect condition as always and it is readily present that the new packaging/color scheme makes the overall box package look very attractive. While opening the package, you will appreciate the two large Styrofoam pieces that are protecting opposite ends of the Thermaltake HardCano 12. What are included in this package are the following items…
- The Thermaltake HardCano 12 unit
- Manual
- Mounting screws
- Thermal tape
- Necessary cables such as 3-pin to 4-pin connectors if they are to be used (depends on your needs).
All of the connectors on the Thermaltake HardCano 12 are already labeled, are easy to read and this makes all the difference in knowing what connector is for what. Every other connection is pre-connected so all you have to do is really pretty much connect the main unit to your power supply and connect your fans into either the 3pin connectors or the 3-pin to 4-pin connectors. The included manual is very clear and includes pictures as instructions if you ever need to use it (you don’t).
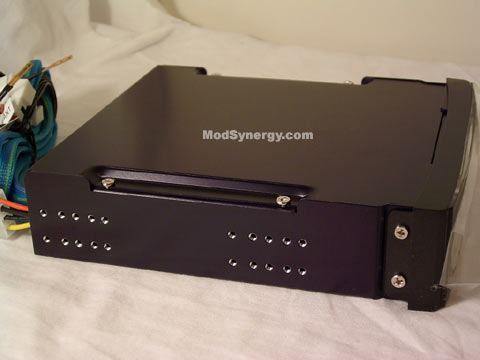
-Here is a side shot of the HardCano 12
The Thermaltake HardCano 12 fits into an empty 5.25” drive bay and looks very sleek and sexy. The exterior is made of aluminum and is of great quality. Notice the nice sleeving, this provides the user with minimal cable clutter because we all want our computers to look clean as possible.

Nice sleeving!
Using the Thermaltake HardCano 12
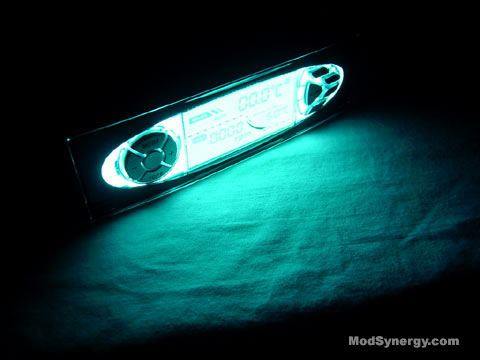
The Thermaltake HardCano 12 is very easy to use and simple to operate. It does not take a genius to operate it. There is a big LCD screen, which displays all the activity of your fan RPM monitor (x4 fans) and also displays your four temperature sources via thermal probe. Does it have any lights? You bet. The Thermaltake HardCano 12 has a very bright and cool looking turquoise backlight, which helps the user to see at nighttime. As with all LCD’s, there is a bit of an angle and the Thermaltake HardCano 12 is no exception. Looking from the viewpoint of upwards to the unit will make it hard to see the text properly. All other angles looking at the text is very good.

The buttons on the Thermaltake HardCano 12 have a nice feel to them. They are made out of plastic and have their respected use labeled already on them. The one thing that I have a problem with these buttons is that they don’t glow or illuminate in the dark. Not making them glow or illuminate will make you ponder what those buttons do. Is this the mode button? Questions such as those come to mind when you can’t see the buttons and their text.

Nice backlight :)
With the Thermaltake HardCano 12, you have it being the ability of controlling four fans and have the use of monitoring four temperature sources via thermal probe. The readings are both in Celsius and Fahrenheit. The temperature sensors are very accurate and update quickly. The same I can say for the fan controller as once you press to increase or decrease the speed, it will take about .5 – 1 seconds to execute the function. As always, if you choose to connect via MOLEX connection, you will lose the ability of monitoring the fans RPM, but you don’t lose the ability of changing their speeds.
Here is how bright the HardCano 12's LCD really is
The Thermaltake HardCano 12 features an audible alarm for each of the four fan controllers. What this does is inform you if all of a sudden one of your fans stops. The alarm is loud as well. Here is a movie of the alarm…MOVIE.
- The movie of the HardCano's audible alarm. (You must have Windows Media Player 9 in order for this movie to function properly).
Conclusion
The Thermaltake HardCano 12 works darn well and includes everything you need to get it started quickly and easily. Everything is pre-connected and ready to go. The only things that are not pre-connected are if you want to use the 3-pin to 4-pin extensions or not. That is your decision. If you are looking for a fan controller and temperature source reader then the Thermaltake HardCano 12 will do it in style with its sleek looks and awesome LCD. The only thing that I did not like about the Thermaltake HardCano 12 is that the buttons do not glow or illuminate so that you can see it in the dark. Other than that, the HardCano 12 gets my recommendation.
Pros and Cons
+
Awesome LCD
+ LCD text easy to read
+ Pre-connected connectors
+ 3pin to 4pin extensions
+ Alarm function
+ Sleeving
+ Excellent quality
- Buttons should be able to see in the dark


